Sunday, 27 May 2012

Tea Towel Bunting


There is still time to make bunting before Jubilee Day (5 June), the 4th of July, picnics, barbeques or summer parties.  I liked the idea of making it from tea towels, as they are cheap and colourful. It takes about two hours from start to finish.  It’s a fun project to do and very satisfying to see it blowing in the breeze.


What you need:
2 tea towels (I chose red and blue because of the Jubilee)
4 meters of seam binding
Lining material (I found some in my scrap box)

Make a pattern with a sheet of plain white paper.  I used A4, folded it in half lengthways, then drew a straight line to make a triangle. There is no correct size, but mine is about 9 ½ inches by 7 ½ inches.


Place one tea towel on top of the other, pin your pattern on and cut.  If you have a rotary cutter this will be easier. 


Arrange your pattern so you get the maximum number of triangles possible.  Some will fit into the V of the last ones. (I cut the last ones on the bias).  Cut out lining using the same paper pattern.


With right sides together, stitch ¼ “ from edge on long sides.


Clip bottom point as close to stitching as you dare.  Trim the edges near the point.  This will ensure a better point when you turn it through.


Clipping the point


Turn and push a blunt pencil or something similar into the point.  Press.


Starting at the center of the bias binding, pin your triangles into place.  (I like mine touching).


Stitch into place.


Fold the bias binding over the raw edges and stitch again as close to the edge as possible.  Stitch the tie ends together at the same time.


If you want to, you can add rings to the ends for hanging the bunting, or you can just leave the ends plain and tie them into place.   


N.B.  The photo shows only half the bunting. I have 8 flags left to add to this because I bought too little bias binding.  I plan to double it as soon as I can get some more!


Monday, 14 May 2012

Monogrammed Aprons


These aprons were easy to make.  I simply traced around the favourite apron in the house - large and long and with ties long enough to wrap around the waist. I added seam allowances at the sides and about 1 1/4 inches top and bottom for substantial hems.

I drew the pocket patterns on paper too, so if I ever want to make more (very likely), I have the pattern pieces ready.


What you need:
About one meter of fabric for each apron.    
A set of D rings for each apron 
A contrasting colour for the monogram.
A small piece of  Bondaweb for the monogram.


To make the monogram:
 I made my own letters on graph paper, but you can find them online.  Once you have got a pattern, trace the letter on fabric or cut out using your pattern.  Use Bondaweb to iron the letter on to the fabric.


I did mine on a pocket before sewing it on to the apron. After ironing the letter on, I zigzagged around the edges in a very small stitch, going around twice to avoid raw edges.If anything went wrong, I could do it again before it was too late.  Imagine picking all those stitches out of a finished apron! 


Here they are finished and hanging up.  You can see they have adjustable neck straps, folded through the D rings.  The ties are very long.  Being about to wrap them around stops the apron from slipping when you are cooking.  Nice to have a big pocket for a cloth or tissue too.

Friday, 11 May 2012

Shirt Dresses - Vintage and New


Vogue Pattern Magazine April 2012
For summer nothing beats a shirt dress.  This from a woman who lives in cropped trousers and t shirts, but I would like to think I could be grown up enough to wear shirt dresses instead.  This summer I plan to make two or three and wear them.  They are elegant, forgiving and comfortable.  Forget the wasp waist.  I'm only showing this to make a point. Shirt dresses can be loose and flowing and tied at the waist with an obi or ribbon to dress them up (on non-dining out days!).


An old favourite which I plan to update by shortening it to just below the knee and extending the shoulders a little.


I wore the one on the left in the early 80's.  It was made of wine coloured silk and I wore matching shoes and a silver belt.  I had a waist then!  I've never made the one on the right, but I think it's lovely.

These two are from the late 80's or early 90's.  I love them both.

I think I stole this from my mother. Might make it and adjust the shoulders. Very 90's.

Late 70's.  I bought this pattern on e bay in a fit of nostalgia for Willi Smith.


More from the 90's.

Very ladylike.  Vogue.  1990's.


This is so sweet and fresh.  It's 90's but could be worn now.  

More Vogue from the 90's.  Can you imagine wafting around in this on  holiday?

Isn't this gorgeous? Vogue 90's again, but right up to date if you remove the shoulder pads.

This one is called a playsuit.  For the under 25's. Circa 1992.

Vogue 1990's again.

Another beauty from the 90's  Vogue. ?there's something so refreshing about checks.  Unfortunately, school uniform has spoiled all that.

From an old McCalls magazine.  Circa 1950. Look at the price.

Very romantic -  Simplicity Magazine, 1957.


Nylon was a big breakthrough in fabrics in the 1950's.  It may have been hot and sweaty, but it required no ironing.


1950's McCalls

1950's McCalls.  Made in wool and strictly speaking, not a shirtdress, but two pieces.  Who could have had a waist that small?  There was no photoshop then.  Wish the fabric was still available.
  Hooray for shirt dresses.  How can you not love them?

Sunday, 6 May 2012

Sugar Cookies

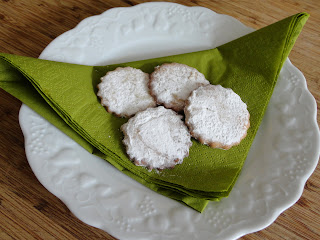
These cookies were an Easter treat this year, but they are good all year round.  We used to have cookie parties with lots of kids over to make them, rolling and cutting, generally having a good time and eating the mixture raw. This year I iced them and had some help decorating them. hey They looked lovely on the table, but I prefer them just dusted with icing sugar when they are warm. They are delicious with a cup of coffee or tea.


 Sugar cookies are very easy to make. I would recommend that you make the whole recipe and freeze half. Then you can make them again when you want them in a hurry.  The dough thaws out very quickly.

Ingredients
3 cups plain flour (Use a coffee mug if you don't have a measuring cup)
1/2 teaspoon baking soda
1/2 teaspoon baking powder
a pinch of salt
1 cup (8 oz) butter (Don't be tempted to use margarine  The butter is what makes them delicious.)
2 eggs
1 cup sugar 
1 teaspoon vanilla essence
Grated rind of one lemon

How to make them
Sift together flour, baking soda, baking powder and salt.
Cut in butter until the mixture looks like breadcrumbs.
In another bowl, beat eggs, add sugar and beat thoroughly.  
Add vanilla and lemon rind.
Blend egg mixture into the flour mixture.
Chill dough for 1 hour or more.
Roll out to 1/8 inch thickness on a floured board.
Use parchment to line baking sheets.
Cut out shapes and carefully put them on the baking sheets.
Bake 6 - 8 minutes at 190 degrees centigrade until very lightly browned.
Put on a wire rack to cool and dust with icing sugar 
OR
When cool, decorate with icing.


Dusted with icing sugar.  Yummy.


Friday, 4 May 2012

Inspiration for Quilts


Last week I went with a friend to the Courtauld Gallery in London to see Mondrian and Nicholson in Parallel.   I have always loved Mondrian's clean lines and use of colour.  However, having embarked on a little quilt making recently, I was struck by how wonderful Nicholson's paintings would translate into quilts.


The one above, in particular, was so subtle and beautiful that I felt I must 'try it at home' in fabric.  It's a project I have filed away for the future.  This photo does not do justice to the original.
The colours are soft khakis, mauves and brown with a textured black in the background.  I can see this as a quilt panel, or a wall hanging, done in soft cotton flannel or wool.  I will be looking out for the appropriate fabrics.

Here are two more, with gorgeous subtle colours and tonality which would lend themselves to quilts.


And another.  Perhaps a collage of fabrics overlaid on each other?


And finally, this one to be made from organza and other delicate fabrics?


How lovely they would be. 

Thursday, 3 May 2012

Make Do and Mend - Using Kick Tape


During the winter I was a great fan of Super Scrimpers.  Every Tuesday night I would be glued to the box,  recording at the same time so I wouldn't miss a minute of the programme. The post-war rationing approach to saving money really appealed to me, although in reality I am not particularly frugal.  It's just that I would like to be. However, there were many good tips, including using vinegar to cut grease on pans and cooker, using bicarb to scrub really grubby surfaces and tiles and remodelling clothes to bring them up to date, sometimes by simply shortening a skirt or dress. I have since done all of these.

kick tape
In my dreams, the team at Super Scrimpers would use me to show people how to make do and mend clothes that still have wear in them.

When I go to the USA once a year, I buy my husband's trousers.  He is big and tall and many US brands cater for men of his size.  We both like Dockers, he because they look good and me because they require practically no ironing.  I usually lug home three pairs in my extra suitcase and I can tell you, they are heavy.

frayed hem
When they get frayed at the hem, I reluctantly throw them away.  This time, I decided to mend a pair with kick tape, because they looked new apart from the frayed hem.  Kick tape is used in good men's clothing and I have noticed it in his suit trousers.  It can be found in the haberdashery section of John Lewis and other fabric shops. You will need one packet for one pair of trousers.

How to do it.

First, unpick the old hem. Then roughly hand-stitch the frayed edges together.


On the right side, pin the kick tape in place, straddling the frayed fabric.  Edge stitch both sides of the kick tape on the machine, finishing off the ends by folding them under and stitching them.


Press, then turn up the hem to include the kick tape and stitch it into place. You will only be turning up the hem a fraction so you needn't worry that the trousers will be too short.  They probably frayed because they were a bit too long in the first place.


Finally, using a damp cloth,  press the hems on the wrong side, turn the trousers right side out and
press them again with a damp cloth (to prevent the fabric going shiny). Then press the seams.
outside view

inside view
Voila.  Trousers that look like new.  Super Scrimpers I am waiting for your call.