Tuesday 18 December 2012

Easy Christmas Stockings

I last made Christmas stockings 29 years ago, just before my daughter was born, during that last adrenaline rush that comes with the nesting instinct.  They are still in use and are filled every year for my grown up children who reciprocate and fill stockings for us with delightful and amusing  things.


This year, or the first time,  my daughter will not be at home for Christmas and so I made stockings for her and her partner to have in their new home.

I thought minimalist would fit their lifestyle best, so I used a neutral coloured background and did not add any appliqué.

The original stockings are in traditional Christmas colours and have gingerbread men and snowmen appliquéd on.

The Snowman who is stained with age and use 

The Gingerbread Man, always the favourite


Back view - a silk wreath


Back view - a Christmas Tree

I used an old linen skirt that I couldn't bear to part with, but can no longer wear.  Following a paper pattern made from tracing the old ones, I cut out four stocking shapes. I added some Liberty fabric for the toes and cuffs, varying the colours so that they could be distinguished from each other. I lined them so that they wouldn't collapse when filled.  Finally (not shown), I sewed purple ribbon loops on the backs so they can be hung. Today we visited my daughter's new house and they are full and plump and hanging up, ready to be opened before they set out to Yorkshire for Christmas with his family.


Almost finished


Saturday 15 December 2012

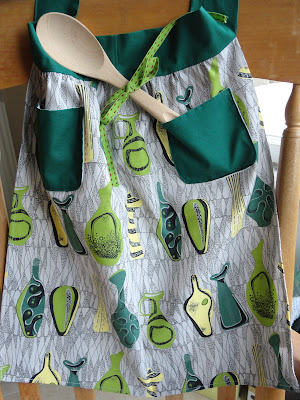
Retro 50's Tea Towel Apron

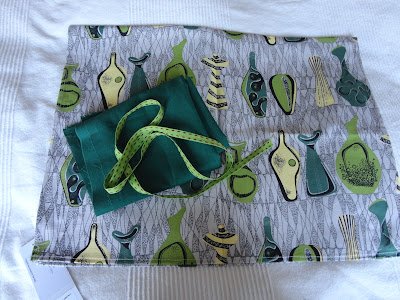
Fabric called 'Urne' by Sanderson, printed in the 1950's

This apron was quick and easy to make.  For me, it is a little bit of nostalgia.

My original intention was to use the towel in landscape, but the print goes one way, so I cut it to length and added a coordinating fabric for the tie and pockets. There is a piece of the tea towel left to make a pot holder should I get around to it.


What inspired me was remembering the church bazaars and Christmas fetes of my childhood.  There were always lots of aprons, some charming and some really quite extraordinary, like the bar/barbeque aprons for men which tied at the waist and were split into two to resemble trousers.  Each part tied around a trouser leg. I'm sure I have one somewhere in the loft along with a Christmas-themed apron which I used to wear each year.  Maybe I'll find them and blog them next year. The loft is a scary place, packed with long-forgotten items and I have no burning desire to go there before Christmas.


Another view


Tied with a pretty bow at the back, it is certainly reminiscent of the 1950's.


Add a wooden spoon tied with a cheeky ribbon and it makes a lovely gift.


Tuesday 11 December 2012

Mid-Week Winter Warmer


The cosy bar and restaurant where we had the soup

A hearty, warming dish


This is a great dish for cold weather, and brrr, is it cold in London today.  My mother used to make it , but I hadn't had it for years until we were in Amsterdam.  Hubby and Hubby's friend found it in a little bar and restaurant after a morning at the Resistance Museum. While riding the tram, they spotted this place, alighted and tucked in.  The next day, a rainy start had us riding the trams to avoid the weather and see some of the city.  We were promised a treat and this was it.
Not content with one bowl, I decided to make more as soon as I returned home.
This dish required a little advance planning.  It is necessary to soak the split peas overnight and then cook them thoroughly (30 - 40 minutes).


The ham hock, parboiled and ready to cook 

with the other ingredients

Green split peas, onion, carrots, celery sticks and a bay leaf


You will need:
1 ham hock or a slab of bacon
3/4 lb split peas, soaked overnight in cold water and then drained
1 T olive oil
1 large onion
2 celery sticks
2 carrots 
1 bay leaf
5 cups (20 oz) water
Salt and pepper
Dried sausage or chorizo (optional)

What to do:
Soak the peas in cold water overnight and then drain.
Cover the ham hock/bacon with cold water and bring to boil.  
Drain off the water and put the meat to one side.
Gently soften the chopped celery, onion and carrots in the olive oil for about 10 minutes. Do not allow it to brown.
Return the meat to the pan and add the peas, water and bay leaf and bring to the boil.  Lower the heat and allow the soup to cook for 40 minutes.  
Remove the meat from the soup and take the discard the fat.  Remove the meat from the bone(s) and chop it up.  Then put it back in the soup. Add in the sliced sausage (if using) and bring back to heat and cook until the sausage is hot.


Sunday 9 December 2012

Quick Christmas Present - Puff Ball Brooches

Pretty puff ball brooches

 These puff ball flower brooches are quick and easy to make and if you wanted to do a lot of them, you could set up a sort of one-person assembly line.  You need some discarded men's ties, clean and silk, if possible; some coordinating lining fabrics; some pretty buttons and some brooch pins.


  • First unpick the ties by hand and remove the interfacing and lining.  Then press them flat, taking care to use a low setting on your iron.
  • Cut three circles: one 8 1/2 inches in diameter, one 6 1/4 inches and one 3 inches in diameter. I got the maximum number of circles out of each tie before cutting out complementary coloured circles. 
  • Iron a small circle of interfacing to the inside centre of the largest circles.  This will make it easier to attach the brooch pins. 
  • By hand run a gathering stitch around the edge of each circle, then gather them ensuring that the right side of the fabric is on the outside. 
  • Stitch the circles together, attaching each layer firmly.  
  • Add a pretty button to finish off the flower.  
  • Stitch a brooch pin near the top of the back.


Add a pretty button to finish each flower


Stitch on a brooch pin.


Friday 7 December 2012

Amsterdam on a November Weekend


Sunday afternoon on the Single Canal

The last time I was in Amsterdam was in the summer in the 60's.  My friend and I stayed in a B & B on the Single Canal and danced all night in the discos near the Dam, walking back to the B & B as the flower markets were setting up for the next day.  Glorious.


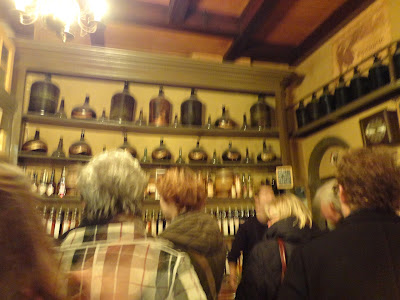
The little liqueur bar, referred to as W F.


This time we did our annual pre-
Christmas trip with friends and it was a wonderful, but altogether different experience. We did not dance all night for a start.  We went at a much more stately pace and enjoyed the city and its beautiful architecture, ate good food and stayed at a posh hotel.

The old bottles are still there and below them, a rank of delicious liqueurs.


Queuing for a 'slurp'. My favourite is half and half,
an orange, cinnamon flavoured drink.


The most amazing thing was

The stairs in the old houses are narrow and steep. You can just see hooks
on the top dormers, used to attach pulleys to take furniture to the upper floors.


finding this little bar which sells liqueurs made in a distillery down the road.  The bar, called Wynand Fockink, hereafter referred to as WF, has been there since the 17th century.   My friend and I had been here in the 60's and I remembered that it was down a little lane by the side of the hotel. Much has changed in the area and the passageway is now covered in glass and filled with modern restaurants, cholate shops and bakeries, but WF remains the same. It's a magical place where you can sample the liquors in tiny glasses, filled so full you are advised to 'slurp' the top before attempting to carry them across the room.  It is always packed with customers and dusty bottles on the walls remind you of its age.

Behind our hotel, on the Single Canal

The Hotel Krasnapolsky where we stayed. Quite a change from our old B & B


A Bridge on the Single Canal


Waiting for the Thalys to take us to Brussels and
then the Eurostar to take us home. Brrr...


Wednesday 28 November 2012

Braised Belly Pork with Apples and Prunes

Ready for the oven
I am still working on my tea towel gifts, but they are not finished, so I thought I would share a warming winter recipe with you.
I bought belly pork thinking it was spare ribs - not paying attention, really.  I wanted to use them with sauerkraut. However, having got them, I decided to do something else with them. You can serve this with jacket potatoes as they will soak up the juice and maximise the use of your oven.


Ingredients:
One package of belly pork slices, about 1 1/2 lbs
1 Tablespoon olive oil
2 onions or 6 - 8 shallots
2 Tablespoons flour
2 apples, cored and quartered
a handful of prunes
a small bottle of cider (about two cups)
2 sprigs of thyme
salt and pepper
a little water

Cooking Method:
Use a hob to oven pan, like a le Creuset casserole pan.
Begin by browning the belly pork slices in a little oil. I did not remove the fat and the rind as they add flavour and can be removed later.
Remove from pan.
Gently cook onions or shallots in the same pan until softened. (5 minutes)
Add the flour and stir to make a paste.
Put the pork and all the other ingredients in the pan and bring to simmering point.
If you need a little more liquid, add some water.  The liquid should cover the other ingredients.
Cover the pan and put it in the oven on low heat  (150 degrees C, 30 degrees F and leave to cook for 1 1/2 to 2 hours.
Remove from the oven and take out the thyme stems before serving.
Serves 4 or 5 people.


With Jacket Potatoes and Steamed Spring Greens

Monday 26 November 2012

Three for Gifts - Maybe

These lovelies are all tea towels.  I purchased two of them from the Victoria and Albert Museum in London where there are lots of goodies to tempt me.  Aren't they great? I plan to transform them into gifts for Christmas. Watch this space to see what they become. I have already started on them.  Hope to finish this week.


This one is based on 'Urne' by Pansa Studios and was manufactured by Sanderson Fabrics in Britain in 1955.

This one is from Crate and Barrel and was a Thanksgiving gift from friends.  

I plan to keep this one, but it is too beautiful to use for dishes!


This one is based on a fabric called 'Houses' by Joy Jarvis and was

 manufactured in Britain in 1950.


Sunday 25 November 2012

London - Early Winter Morning


 I woke up early this morning, feeling refreshed and ready to get up.  This was my view from the back window. It's such a typical London scene with clouds scudding along behind the trees and chimney pots. I love the greyness of it all while I am warm and cosy in the house with the kettle boiling merrily in the background.

This view is looking left over The Chase, an area that might once have been alive 

with the clip clop of horses' hooves.


An hour later and the sun is trying to climb up into the sky.

 Happy Sunday.

Thursday 22 November 2012

Happy Thanksgiving


Three tables set, ready for 19 people

Happy Thanksgiving to everyone who is celebrating it today.  In London, there is a choral service at St Paul's Cathedral and many restaurants will have a special Thanksgiving menu today. We, however, celebrated our Thanksgiving on Sunday 18 November.  As it is not a national holiday in Britain, we celebrate it on the Sunday before.This has become a tradition in our house and we have done this for more than 20 years.  We share it with many friends, who over the years have come to anticipate it as much as we do.
Thanksgiving is not a substitute for Christmas.  It is a celebration of survival. It is most American's favourite holiday and more people travel on Thanksgiving weekend than at any other time of the year.  They want to be with their family and friends to relax, catch up and enjoy a good meal. There is none of the pressure of Christmas -  gifts, trees and decorations.  It is just a good meal and a good time to get together.
The story of Thanksgiving is that the Pilgrim fathers left Plymouth in Devon in 1609 for the new world and arrived farther north than they had anticipated.  They landed in a place they were to name Plymouth, in what was to become the state of Massachusetts. Many of their people had died on the journey and they were dismayed to find the country so inhospitable and cold.  They had no shelter and very little food.  Their leader, William Bradford, obtained corn (maize) from the native Americans and made an ally of an Indian Chief by curing him of an illness. The Native Americans also introduced them to indigenous food such as turkey, cranberries, pumpkins, sweet potatoes and, of course, corn.  All of these feature in the Thanksgiving menu. It is said that after a year, with the help of the Native Americans, the two races sat down and shared a harvest meal, giving thanks for their survival.

My first, ever, pumpkin harvest


Pumpkin Pie

It is easiest to use ready made pastry.  This year, I made Mrs Beeton's rich short crust pastry, which was superb, but time consuming. It can be rolled out and then pressed into a buttered pie dish. It is much easier to deal with than traditional short crust pastry. I use my food processor to cut the butter into the flour.

Rich short crust pastry
1 lb plain flour
pinch salt
10 - 12 oz butter, cut into small pieces
2 teasp sugar
2 egg yolks
a little cold water to mix

Sift the flour and salt together.
Rub the butter into the flour until it resembles bread crumbs.
Add sugar and egg yolks and make a still paste, then add water until it is malleable. (not too soft!)
Put in the refrigerator for at least 30 minutes and then bring to room temperature before rolling out.
Blind bake for 10 minutes. (Makes two 9" pastry shells.)

Pumpkin Pie Filling
29 oz  cooked pumpkin (If I can't get tinned pumpkin, I quarter pumpkins or squashes and bake them in the oven for 1 hour, then scoop out the flesh and put it in the food processor until smooth.)
1 tsp salt
1 cup white sugar
1 cup soft brown sugar
2 tsp ground cinnamon 
1 tsp ground ginger
1/2 tsp ground nutmeg
1/2 tsp mixed spice
4 large eggs
2 12fl oz cans evaporated milk

Put the pumpkin in a large bowl.
Add spices and whisked eggs and beat until smooth. 
Carefully add the evaporated milk (so it doesn't splatter everywhere)
Pour carefully into pastry shells, nearly to the top. (It will be quite liquid.)
Gently place in pre-heated 200 degree oven and bake for 10 minutes.
Turn the heat down to 180 and continue baking for 30 minutes,.  Check that the filling is set but not too hard.  I aways reheat mine before serving so I don't want them to be over baked.

Serve warm with double cream whisked with a pinch of sugar or good quality vanilla ice cream.

A velvet pumpkin which I covet


Tuesday 20 November 2012

Mac and Cheese - My Way

A serving of macaroni cheese with salad.
One of my family's favourite meals is macaroni cheese - my way.  While I was in the USA one magazine had seven recipe variations for this dish, but stupidly, I forgot to tear the pages out and bring them home. Never mind.  I don't think I can improve on this one.  This is not bragging.  My husband and son love it and so does my son's girlfriend.  It all disappears in one sitting.

I double the recipe for four of us (should feed eight) and I am not allowed to say 'No thirds' to anyone. The recipe is based on one from a book called 'Modern Approach to Everyday Cooking', which I follow for butter and milk,  but I cut down on the cheese. Still, be warned.  It is not low calorie.  Here's how to make it.

Ingredients: (for a single recipe)

7 oz macaroni
3 Tablespoons butter
1/4 cup plain flour
1/2 teaspoon salt
pepper
1 tablespoon powdered mustard
dash of cayenne
2 cups milk (16 oz)
1 cup grated Cheddar cheese plus some for topping
1 tin whole or chopped tomatoes
a sprinkle of oregano

Make the sauce by melting the butter in a saucepan. 
Add the flour and stir until mixed in.
Add the salt, pepper, mustard and cayenne.
Take off the heat and add the milk and whisk until smooth and bubbling.
Remove from heat and add most of the grated cheese.
Cover and leave until macaroni is cooked.
Cook the macaroni until it is al dente  (about 1 minute less than it says on the packet).
Drain and add the cheese sauce and mix thoroughly. 
Pour the mixture into a casserole dish.
Make little holes with a spoon and put a bit of tomato into each hole.  Save the juice for another dish.
Top the dish with the rest of the grated Cheddar.
Bake at 180 degrees centigrade until the top is nicely browned and the rest is bubbling.
Allow to stand 5 minutes before serving.


Ready for the oven


Serve with a crispy salad


Bon appétit!

Sunday 11 November 2012

Brocade Evening Bags

I have just returned from the USA where I spent a happy day with my friend who would definitely win the 'Whoever has the most fabric' award. We played happily with a box full of furnishing fabric samples which she purchased for 25 cents each.  She also acquired handles and trims from sales and at discounted prices in shops to compose a beautiful array of treasures which will become lovely, elegant bags Here is the almost finished prototype.  The lining, which is a suede type of fabric will need to be stitched in by hand. Although this is not quite a tutorial, I  will show you what we did a little farther down on the page.  My friend plans to set up a production line and then set to work to make these for Christmas presents or to sell.


Here is the stash


Collection of materials for first bag


Another collection for two more bags


More more more


I love this red!

Glorious gold


Subtly gorgeous creams and blues


My favourite


Outside of bag with wadding inside and trims sewn on.

Making the Bag

Cut two pieces for the bag and one long piece for the lining.  The finished bag is approximately 11" by 8" (like an A4 sheet of paper).

With right sides of fabric facing, stitch the beaded trim to the bottom of the bag pieces with a narrow seam, ensuring you catch the trim inside.

Interface the bag with interfacing, or wadding.  We used wadding.  If you want to quilt it, now is the time.

Close up of trim.

Add trims.

Stitch side seams with right sides facing.

Turn under top of bag about 1" and stitch.

Add handles by making tabs and looping them through the handles.  Stitch to inside of bag.

Stitch lining fabric by folding the long ends together and stitching on each side, ensuring that it is slightly narrower than the bag itself.

Slide lining into the bag and fold under surplus material, then finish by hand.


Bag and lining


A better view of the beaded trim.


Lining from inside.


Sliding the lining in.


Almost finished.  Just needs the lining stitched in.