Saturday, 31 March 2012

Fortune Cookie Bag


These fortune cookie bags are wonderful.  So useful and pretty. I have made about a dozen of them and given them as presents to family and friends.  I saw something similar at the V & A awhile ago and thought it was such a good idea.  You can put just about everything in it.  It can be used as a shopping bag (to save using plastic ones), for carrying your gym kit or your swimming things, to carry baby things, or even to keep your knitting or crafts in.  I have used mine for most of the above (no babies). One of my friends wore hers to a wedding.  Another friend called it a "Tardis' bag as it holds so much.


This is what it looks like when it is flat.  


This is another one with the 'ears' tied to make a handle.
To use it, you simply tie the 'rabbit ears' together and sling it over your arm or over your shoulder.

How to Make It

You will need two squares of fabric 30" by 30" (76cm x 76cm).
With wrong sides together, cut a diagonal line from the top left hand corner to the bottom right hand corner.
Now cut a diagonal line from the top right hand corner to the centre of fabric.


Finally, cut a little square in the middle of the V (about 4" by 4").


With right sides together, stitch the smaller triangles to the larger triangles, leaving a little space at the top to insert the gussets.


Make a little gusset by folding the squares in half and inserting them in the V's of the bag as shown.  I have used white thread so it is easier to see.  However, when I make this bag, I will use matching thread.


The one below is finished.


Stitch all all around the sides and bottom of the bag, leaving the centre free.

Stitch down the inside of the bag handles ('ears') about 7".

Finish all raw edges by edge stitching or zig zagging.


Press, turn to right side and you are finished.

To use the bag, tie the handles together at the top.  You can wear it over your shoulder or over your arm.


Sunday, 25 March 2012

Progress on my Quilt


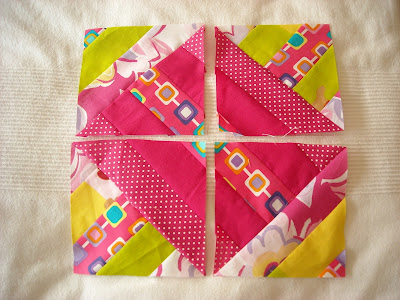
This is it so far, laid out on the bed.  It's very bright, not to say garish, but having spent two precious days on it, I am reluctant to scrap it (forgive the pun) now.  I had to discard about 16 blocks because they really were too loud.  Consequently, I now have a baby-size quilt.  Babies love bright colours, right?  Next step - stitch the blocks together, buy some wadding and backing and machine quilt it.


Here is how I did it.  I used lots of fabrics that I had.  You might like to think your colour scheme through before you start.


Cut strips 2 1/2 " wide and approximately 45" long.  If you cut across the fabric, this will probably do it.  
With right sides together, join five strips together along the long edges.  See above. Seam allowance is 1/4".  Press all seams in same direction. Trim the ends of the long strips, which are inevitably not straight after stitching.


The strips will measure approximately 10" in width.  Cut the long strips into 10" lengths which will make them square.


Lay two squares face together with the strips going horizontally on one and vertically on the other.


Stitch around all four edges using a 1/4" seam allowance.


Carefully cut through both layers diagonally to form four triangles.


Open out each triangle to form a square.  Press carefully.


Now lay them out of a flat surface and try not to go arrgh as I did.
Better luck next time, for me, I hope.

Next instalment as soon as I can get the materials (Kingston, Tuesday).  Finished quilt to appear soon. 

Hubby has just fed me roast chicken, several veg and my own lemon cake and ice cream.  Must go lie down and let it digest.


Giveaway from Annabelle Serendipity (Not me)


Zara cushion cover


This beautiful embroidered cushion cover is a giveaway from AnnabelleSerendipity.blogspot.com. The deadline is today.  To win it, you need to go to her blog site and find out how to enter the competition.  If you do, you are in for a treat, as Annabelle Serendipity makes beautiful things, collects beautiful things, produces delicious food and  shares the recipes.

Good luck,

The other Annabelle(Louise).

Wednesday, 21 March 2012

Just getting ready to do some patchwork

I am just getting ready to do some patchwork this morning before I run errands, have lunch, read a chapter of my book for the book club (A Glass of Blessings by Barbara Pym) and then tutor.  Wednesday is the day my husband is out all day and evening so I can make a mess and not worry about fixing an evening meal. Not that he minds or is incapable of cooking.  Quite the opposite.  He's a terrific cook.  But I can carry on working, then eat pizza in front of the tv.  After that I usually want to head for bed as I am waking up exceedingly early these days.  

I will be using Annabelle Serendipity's pattern (shown last week).  Yesterday, she showed me how to do the 'wizardry' bit.  Last night I cut out a few strips, then went through the box under the bed to find more fabrics.  Do these go together?  Lots of pink. 


Looking forward to using my machine again.  Watch this space for progress updates.

Thursday, 15 March 2012

My Pretty Blue Beads

I love blue and I wear it a lot in the summer. These are some of my lovely blue necklaces.


This one is a particular favourite. I bought it in France at Gallerie Lafayette about 20 years ago for the equivalent of £10 and I never fail to get complements on it.


Here is another one, paler and good with denim and light, greenish blue.  I also bought this one about 20 years ago in a shop called Chico's in the USA.  Chico's has wonderful, inexpensive jewellery. Much of it is influenced by the South West of the USA.


Nearly all my beaded necklaces have had to be re-strung at some time. Probably because I wear them a lot.  It's worth doing if you have something you treasure and want to keep.

Wednesday, 14 March 2012

Weekend Quilt


This quilt can be made in a weekend if you have everything organised and ready to go.


Mine is a Make Do and Mend quilt, so I have used an old, ragged sleeping bag for the filling (removing the zip) and my husband’s old Oxford cloth shirt, my old linen skirt and some pieces of linen fabric which were languishing in my fabric cupboard.

The finished quilt measures 72" x 52" (132cm x 178cm).


You can see how ragged the sleeping bag is.  I mended the worst of it by stitching on some inexpensive white polyester cotton by machine. 


What you need to make the quilt:


  • Enough coordinating fabric to make the patchwork. (approximately 3 1/2 meters).
  • 2 meters of backing fabric 140 cm wide.   (I used a single flannelette sheet and cut it to size just before I attached it.)
  • An old sleeping bag or blanket to use as the filling.
  • A rotary cutter to cut the rectangles.  ( You could cut them with scissors as long as you ensure that the sides are perfectly straight.  Drawing on the fabric with a pencil helps.
Begin by cutting the following pieces:


  • Fourteen 10” by 12” rectangles.   
  • Thirty  8” by 10” and 3 8” by 5” rectangles.
  • Forty  4” by 12”  rectangles.

With right sides together, stitch together the short ends of seven 10” by 12”rectangles to make a panel.  Do this twice for two panels.

Stitch together ten 8” by 10” rectangles and one 8” by 5”. To make a panel. Do this three times. You will need three panels.

Finally stitch together ten 4” by 10” rectangles to make a panel.   Do this four times. You will need four panels.


Press your seams all in the same direction.  Lay strips out on a flat surface and arrange your panels in this way.  Begin with an 8” wide panel, then follow with a 4” panel, then 10” 4” 8” 4” 10” 4” 8”. Stitch panels together lengthwise in groups of two or three.  Working with smaller groups of panels is easier to machine. Press seams.  Now join all the panels together lengthwise.


This is a back view of the quilt. Stitching is in progress.

With right sides together, attach the backing fabric on three sides, making a sort of duvet cover.  ‘Turn right side out and press again.  Slide the filler (sleeping bag, blanket) in just as you would if you were putting a duvet in its cover.

Pin carefully around the edges going through all the layers.

Turn up fabric at the bottom edge and stitch by hand or machine.

 Tie quilt using crewel wool and a chenille needle to keep all layers together. This is simply cutting 6” pieces of wool, stitching through the layers and tying a little knot or bow on the underside of the quilt.  I did mine at the corners of squares around the outside edges.  You may do a few randomly in the center as well.

Your quilt is finished. Enjoy.  It's light weight and very warm.


Sunday, 11 March 2012

What I Saw and What I Bought at Teddington Textile Fair

Yesterday a friend and I went to the Textile Fair in Teddington.
These were my two favourite stands:


Linda Howells Arty Fizz
 http://chocolatelifeandjazz.blogspot.com. 


Linda does wonderful patchwork decorated with embroidery, beads, buttons and other, lovely quirky things.


She also makes bags and books dying fabric with leaves, onion skins, embossing and fusing.things into her designs. 


Jennifer M Taylor
www.pinkshoelady.co.uk

Jennifer's stall was like an old-fashioned sewing and haberdashery store, full of vintage fabrics, hats, buttons, trims and clothes.  I regret that I did not buy the darning egg.  My mother had one and they are useful even if you don't darn socks!


What I bought

This roll of fabric - three pieces of more than a meter each.  As well as a piece of vintage upholstery fabric.


Here they are.  Left to right: Vintage red upholstery fabric; cream silk  with embroidered leaft pattern which will become sitting room cushions; black taffeta with embroidered black and brown fronds and red and taupe floral brocade for evening bags.


Thursday, 1 March 2012

Patchwork Bag


 I made this patchwork bag in four hours in a class at John Lewis Kingston, sponsored by Rowan.

The bag is quite easy to make and consists of 15 strips of cotton fabric (ideally all the same weight). Our fabrics, which are by Amy Butler, were already chosen and cut.  As I love pink,  I was very happy with them.  Amazingly,  although all eight of us on the course had the same fabrics, all the bags looked different according to each person's choice of arrangement.

For the bag you need 15 strips of cotton cut into 2 1/2 " by 22" pieces.  Seam allowances are 1/4".


Lay out your strips in an order that is pleasing to you.
With right sides together, sew the long edges until you have one oblong.  The middle strip (number 8) will be the bottom of the bag.  Don't put your favourite pattern at the bottom as I did.


Once your strips are all sewn,  press the seams going in the same direction.   Now you need to cut your work into four equal pieces vertically.  With right sides all facing you, turn two strips around top to bottom.  With right sides together, stitch the pieces together with 1/4' seams.  Press again. At this point, trim the edges so they are nice and straight.

Layer your work by putting your lining face down on a table.  Sandwich a piece of wadding between the lining and the patchwork, placing the patchwork right side up.  Carefully pin the layers to keep them in place.  Now you can do some stitching on the outside going through all three layers.   Stitch in the ditch of seams 1,4,7,8,11 and 14, leaving 1" from the raw edge.  If you wish, stitch diagonal lines from 1 to 7 making an x.  Do this again between 9 and 14.


This is the tricky bit.  With right sides together, stitch the patchwork piece together at the sides without catching the wadding or the lining. Trim back the wadding, if necessary.  The edges of the wadding should meet but not overlap.


Pin the lining in place at the side edge, overlapping the seam allowance to make a neat finish and hand stitch the edge.

Turn the bag inside out and fold bottom corners to form a little v.  Stitch across the v to make the bottom of the bag sit flat.


Use a long strip of fabric to bind the top of the bag stitching down only one side.  Attach handles and hand stitch the inside of the binding.

If you wish, you can add a button and loop to the top of the bag for security.

I decided to buy bamboo handles, but you could easily make cloth handles from matching fabric.

I have included some rough drawings below to clarify directions.